Rinse the peppers, pat dry, cut off the stem and bottom, then slice each one open and halve or quarter, discarding cores and ribs. Brush both sides with about a tablespoon of olive oil per pepper and let them marinate for 30 minutes in an acid‑herb mixture. Preheat the grill to high, then lower to medium‑high (~450 °F). Place halves cut‑side down, sear 4‑5 minutes, flip, and grill the skin side 3‑4 minutes. Transfer to a covered container to steam 10‑20 minutes, peel, and toss with oil, salt, pepper, and a balsamic or chimichurri vinaigrette. Keep reading for deeper tips.
Prepare Bell Peppers for Grilling: Cleaning, Cutting, and Oiling
When you prep bell peppers for grilling, start by rinsing them under cool water, patting them dry, and removing any stickers before you cut. Slice off the stem and bottom, then open each pepper along one side to flatten it. Halve or quarter the pieces, discard the core and ribs, and pull out the seed pod with a knife or fingers. Brush both sides with roughly one tablespoon of olive oil per pepper, ensuring even coverage; add salt and black pepper for adhesion. If you plan to marinate bell peppers, place the oiled strips in a zip‑top bag with your chosen acid, herbs, and a splash of oil, then refrigerate for 30 minutes. For a quick topping, blend bell pepper sauce using the reserved seeds and membranes, then drizzle over the grilled pieces. Like zucchini, bell peppers should be seasoned properly before grilling to ensure even flavor and browning. Preheat the grill on HIGH before placing the peppers.
Preheat the Grill for Grilled Bell Peppers: Zones & Temperature
After oiling the pepper strips, set the grill to a high setting for a brief burst of heat, then lower it to medium‑high so the grates settle around 450 °F (230‑240 °C). Begin with the burner on high for 2–3 minutes; this creates a rapid heat surge that blisters the surface. Switch the control to medium‑high and let the grill stabilize. Use a built‑in thermometer or infrared probe for temperature monitoring; aim for a consistent 450 °F zone across the cooking surface. Keeping your grill lid closed where possible will help stabilize temperature and maintain consistent heat throughout the cooking process. If your grill has multiple burners, keep one at medium‑high for direct heat and the other off to prevent flare‑ups. This heat control strategy guarantees even searing without burning, preparing the grill for uniform pepper cooking. Arrange peppers on the grill with 1‑2 inches between them to ensure even cooking.
Grill Pepper Halves Perfectly: Timing, Positioning, and Flipping
How long should you let pepper halves sear before flipping? Place the halves cut‑side down on a preheated grill, brush both sides with olive oil, and season with salt and pepper. Close the lid and let them cook undisturbed for four to five minutes; this interval creates deep sear marks and begins leveraging grilled flavor. After this period, flip each half with tongs or a metal spatula and close the lid again. Grill the skin side for three to four minutes, monitoring for light charring and blistering. Total time is about eight minutes. When a fork pierces the flesh easily and both sides show balanced char, the peppers are fork‑tender and the sear marks are mastered, delivering ideal flavor and texture. For enhanced flavor complexity, consider adding lemon zest or garlic to your seasoning blend before grilling. Use grill tongs weekly for safe handling.
Grill Pepper Rings & Strips: Pan‑Grill Tips for Perfect Marks
Start by preheating your grill or grill pan to about 400 °F, then lightly spray the surface with non‑stick oil. Arrange the ½‑inch rings in a single layer, leaving space for airflow. Grill 3‑4 minutes per side, turning with tongs to avoid sticking. Rotate each ring 90° after the first flip to create diamond‑shaped, even grill marks. For strips, lay planks across the pan, grill 2‑3 minutes per side, and flip once; the longer grain yields a firmer pepper texture while still achieving crisp edges. Monitor blistering; excessive blackening indicates over‑cooking. Remove peppers promptly, rest on a cool zone, and serve while the texture remains tender yet slightly charred. Like onions, peppers benefit from indirect heat to prevent burning and ensure even caramelization. Allow peppers to marinate for at least 30 minutes before grilling.

12" NON-STICK GRILL SKILLET WITH CLIP-ON HANDLE FOR INDOOR & OUTDOOR USE – This premium non-stick grilling skillet uniquely combines a cool-touch clip-on wooden handle with 2-inch high sides, delivering superior food control and flare-up prevention. The perfect non-stick grill pan for vegetables, seafood, and meats on gas grills, charcoal grills, and indoor cooking setups.
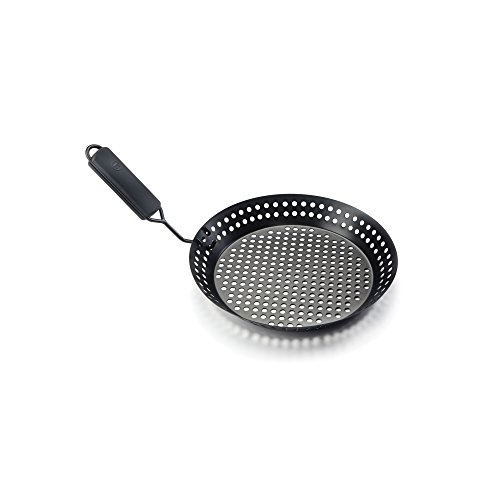
NON-STICK SURFACE ensures that this skillet is a dream to clean!

【Upgrade Large Size 8 Inch Omelette Ring】- Do you have hassle that your egg ring is too small to do a large omelett rings?Look here.Our 8 Inch Omelette Ring is shaped half circle omelet,Large ring holds the egg and toppings until done, then add cheese and fold in half for a delicious omelet.You will finish a happy funny breakfast omelette eaisly in minutes and share with your families in the morning happily.Enjoy your warm familiy breakfast time and have a good star in a new day.
Fix Over‑cooking, Sticking, and Uneven Char on Grilled Peppers
If you keep the grill at a steady 350‑400 °F and watch the peppers closely, you can prevent over‑cooking, sticking, and uneven char all at once. First, preheat the grates until dry; no oil or water droplets should remain, which eliminates sticking. Place whole peppers skin‑side down, spaced 1–2 inches apart, and close the lid. Rotate every 3 minutes, flipping with tongs 2–3 times, to achieve uniform blistering without blackening. Remove peppers when they’re mostly blistered but still crisp—this preserves ideal texture and prevents sogginess. If you plan to add sauce, do it after grilling; a thin, evenly‑distributed coating maintains sauce consistency without steaming the flesh. For enhanced flavor, consider marinating peppers in a flavorful mixture before grilling to improve taste and tenderness. Monitoring timing and temperature guarantees a balanced char and firm bite. Stir‑frying is the expert‑recommended method to keep red bell peppers firm and bright.
Finish With Steam and Peel: Achieving Tender Skin‑Less Peppers
Precision comes from trapping the heat you just generated on the grill; as soon as the peppers are blistered, transfer them to a lidded, heat‑proof container and seal it to let the internal steam loosen the charred skin. Immediately cover with a tight‑fitting lid or plastic wrap; the residual heat creates steam that softens the charred skin removal and begins pepper flesh tenderness. Steam for at least ten minutes, extending to fifteen‑twenty minutes for ideal results, or thirty minutes if you prefer maximum softness. After cooling enough to handle, peel by hand—skin should slip off effortlessly. Before grilling, you can prepare your grill grates using a simple onion hack to remove carbonization and charred debris, ensuring optimal heat distribution for your peppers. Remove stems, seeds, and membranes, then slice or dice as needed. Avoid rinsing to preserve smoky flavor; store peeled peppers in oil or use immediately. (For best results, follow the peeling peppers steps).
Season and Dress: Salt, Herbs, Balsamic & Chimichurri Options
A handful of well‑balanced seasonings transforms grilled bell peppers from simple to spectacular. First, toss peppers in 1–3 Tbsp extra‑virgin olive oil, then sprinkle ½ tsp kosher salt per four peppers and a pinch of ground black pepper; this guarantees even coating and flavor foundation. Seasoning pro tips: use sea salt for a coarser bite or avocado oil for higher smoke point. Like yellow squash, bell peppers should be cooked just until tender to preserve their natural sweetness and texture. After grilling, apply a quick vina: whisk 2 Tbsp balsamic vinegar with oil, minced garlic, thyme, and a dash of Dijon mustard; drizzle over hot peppers and let sit 15 minutes—marinade enhances depth. Finish with fresh herbs: basil, parsley, or oregano added post‑grill preserves brightness. For chimichurri, blend basil, white‑wine vinegar, salt, pepper, and oil; optionally top with capers and toasted pine nuts for texture. The recipe is super easy with only six ingredients, making it perfect for any occasion.

One 25.4 fl oz bottle of Bertolli USDA and Non-GMO Certified Organic Extra Virgin Olive Oil, Rich Taste

SMOOTH EXTRA VIRGIN OLIVE OIL BULK SIZE: Expertly crafted by The Olive Oil People using first cold pressed olives, Smooth EVOO with naturally occurring polyphenols

What to Serve With Grilled Peppers: Ribs, Chicken, Burrata & More
Three standout pairings elevate grilled bell peppers beyond a side dish: a creamy burrata plate, a smoky rib or chicken main, and a vibrant salad or grain bowl. For burrata, arrange warm peppers, addd,, then top with sliced burrata, toasted breadcrumbs, pine nuts, and a drizzle of basil vinaigrette. For meat, season ribs or chicken with chipotle or BBQ rub, grill until charred, and finish with a spoonful of diced peppers and a side of pickled peppers for acidity. For salads, combine grilled peppers with quinoa, mango‑cucumber cubes, and a herbaceous sauce; sprinkle extra diced peppers for texture. Each option balances heat, creaminess, and tang, turning peppers from garnish to centerpiece. The Maillard reaction adds savory depth to the dish. Achieving this complex flavor requires preheating your grill to very high heat to develop the flavorful crust that makes grilled peppers truly shine.

Give the edge your recipes crave with Sargento Low Moisture Part-Skim Mozzarella & Parmesan Shredded Natural Cheeses with McCormick Naturally Flavored Crushed Red Pepper

Exclusively selected and passionately sourced from farmers and producers around the world

Our artisanal Burrata is a fresh Italian cheese made from mozzarella and cream. The outer shell is solid mozzarella, while the inside contains stracciatella and cream, giving it an unusual, soft texture.
Grilled Bell Pepper Health Facts & Low‑Carb Alternatives
After pairing grilled peppers with meats or salads, you’ll want to know what they actually add to your diet. Grilled bell peppers deliver roughly 74 calories per serving, 7 g carbs, 5.1 g fat, and 1 g protein, while retaining high nutrient density. They supply 120 mg vitamin C per cup (green) and 169 % RDI per medium red pepper, plus beta‑carotene, vitamin B6, K1, and E. Fiber totals 2 g per 100 g, supporting digestive health and low net carbs. These micronutrients aid immune function, blood pressure regulation, and antioxidant protection, which can lower disease risk. For weight management, the low caloric density and high fiber keep satiety high. To prevent sticking when grilling your peppers, oil the grill grates with a paper towel dipped in vegetable oil before cooking. Low‑carb alternatives include any color; red and orange maximize beta‑carotene, while green adds bitterness and pairs well with roasted dishes. Capsicum annuum species also include jalapeños, which are rich in capsaicin.