
Yes, you can add a rotisserie to most pellet grills by picking a kit that fits your grill’s width, motor slot, and bracket layout, then mounting it securely to the side panel. Choose stainless‑steel components, a heavy‑duty motor, and a balanced spit rod for consistent 3‑4 RPM rotation. Verify power compatibility, set the grill to 350‑375 °F, and use a drip pan to catch drippings. Follow systematic installation steps and you’ll achieve even, self‑basting cooking while preserving moisture and flavor. Keep reading for detailed setup and troubleshooting tips.
What a Pellet Grill Rotisserie Does and Why It Matters
When you mount a rotisserie on a pellet grill, you turn the cooking process into a controlled, continuous rotation that guarantees even heat exposure for every surface of the meat. This mechanism delivers exceptional heat distribution by constantly presenting each side to the radiant source, eliminating hot spots and the need for manual flipping. As the meat spins, its own juices baste the surface, producing a self‑basting effect that preserves moisture and intensifies flavor without extra effort—an effortless meal prep advantage. The constant motion renders fat evenly, crisps the exterior, and keeps the interior tender, while the pellet grill’s smoke penetrates uniformly for deeper taste. The result is a reliable, systematic cooking method that maximizes efficiency and consistency. The rotisserie also enables self‑basting by allowing the meat’s own juices to continuously coat it during cooking.
Choose the Ideal Rotisserie Kit for Your Grill Model
One of the first decisions you’ll make is whether to go with a branded kit that matches your grill’s model or a universal kit that fits a range of dimensions. Evaluate proper fit considerations by measuring the grill’s width, checking for a dedicated motor slot, and confirming bracket compatibility. Brand compatibility factors dictate that a Masterbuilt Gravity Series kit will only work on its 16 listed models, while a Weber part 3400252 fits exclusively the Searwood 600 pellet grill and Spirit gas series. If your grill lacks a model‑specific offering, a GrillSpot universal kit can accommodate most brands after you verify the dimensions and attach supplemental brackets. Prioritize stainless‑steel components, a heavy‑duty motor, and a balanced spit rod to guarantee reliable, even rotation. The motor’s torque ensures consistent speed even with larger cuts of meat.

🔥[Enhanced Compatibility] The TURBRO Rotisserie Kit RK45 boasts a versatile design, accommodating both horizontal and vertical motor installation holes. This expanded compatibility opens the doors for a broader range of grill types, ensuring that more users can relish the delights of rotisserie-style cooking, regardless of their specific grill configuration.

✅The spite rod holder comes with 5 slots for adjustable grill poles of different lengths to fit a wide range of grills. The barbecue rods are designed with screws together for easy storage, and the motor with insulated housing and a waterproof switch makes it safer to use in the kitchen.

NOTABLE SPECS
Gather the Required Tools and Parts
After selecting the appropriate rotisserie kit, gather every tool and component you’ll need for a smooth install. Confirm rotisserie component quality and note grill compatibility considerations before you begin. Pack the drilling template, small pilot drill bit, step bit, eye protection, and gloves. Include the model‑specific main bracket, reducer plate (or its removal for YS1500S/Cimarron), and thumbscrews. Assemble the spit rod using the correct length sections, copper washer, wrench, forks, and bushing. Prepare the spit hanger bracket, model‑specific hangers, nuts, and spacer hardware. Add heat‑proof gloves, trussing twine, drip pan, and a motor test device. Remove cooking grates, top rack, and position the smokestack for re‑insertion. This systematic inventory guarantees every part aligns with your grill’s specifications. When installing your rotisserie, pay close attention to motor strength as it directly impacts the rotation consistency and cooking performance. Motor must be securely fastened to the bracket to ensure proper rotation.

【Compatible Models】This rotisserie kit is worked for Traeger Pro 22, Pro 575, Pro 780 Series Wood Pellet Grill and Smoker. ★NOTE: ONLY FOR THESE 3 MODELS, CHECK YOUR GRILL BEFORE ORDERING!
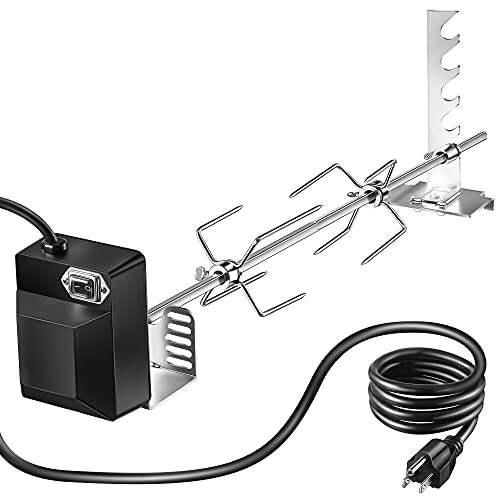
Complete Rotisserie Grill Kit: this universal grill rotisserie kit comes with a total of 23 pieces including 1 piece 120V 4W rotisserie motor, 2 pieces 14-inch skewers that can be spliced, 2 pieces 4-prong forks, 1 piece shaft, 14 pieces fixing screws, 1 motor holder, and 2 spit rod supports. Designed as a full outdoor rotisserie grill with motor, it fits most 2- to 6-burner grills regardless of brand, giving you everything you need for delicious spit-roasted meals at your backyard BBQ party
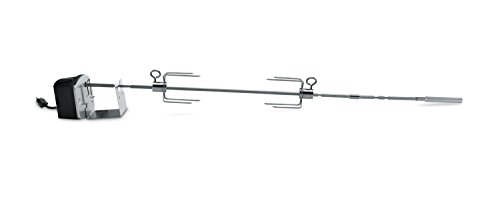
NEXT LEVEL GRILLING: Explore new menu items right from your backyard with the Weber Rotisserie Kit
Install the Weber Searwood 600 Rotisserie: Step‑by‑Step
First, secure the rotisserie’s mounting hardware to the Searwood 600’s side panel using the supplied bolts, ensuring each fastener is tightened to the manufacturer’s torque specification. Next, attach the heavy‑duty electric motor to the side bracket, aligning the stainless‑steel shaft with the motor’s drive gear. Slide the shaft through the provided rotisserie forks, then lock the forks onto the shaft using the quick‑release pins; the forks’ quality construction features guarantee firm grip on both large and small cuts. Mount the handle onto the motor’s toggle switch for convenient handling options, then connect the motor’s power cord to the grill’s 120 V outlet. Consider upgrading to stainless steel grates if your pellet grill uses factory-standard grates, as they offer superior durability and heat retention for rotisserie cooking. Finally, test rotation with a 5‑lb load confirming smooth operation before loading your meat. The rotisserie is compatible with the Searwood 600 pellet grill and Spirit gas grills.

Holds up to 30 pounds capacity. 110 volts with on/off switch.

Electric motor with waterproof on/off switch and auto reverse function. Cable length:36”.

Unique And Solid: With Fixed And Variable Mounting Holes, This Bracket Set Provides A Unique Ability To Be Exceptionally Solid
DIY Adaptations: Making Universal Kits Work on Any Pellet Grill
Securing the Searwood 600 rotisserie gave you a clear view of how universal kits differ in mounting geometry, so you can now adapt them to any pellet grill. First, measure the grill’s width and bracket‑mounting points; most kits—Onlyfire, MHP, Nexgrill—use a square‑shaped rod that fits a motor housing with a single screw, washer, and nut. If the stock bracket misses the pellet‑grill frame, create custom mounting brackets from stainless steel, matching the kit’s screw pattern and adding reinforcement plates where the grill’s metal is thin. Next, verify power compatibility; the 110V‑220V Onlyfire motor works on standard outlets, but you may explore alternative power sources such as a 12 V DC converter for off‑grid setups. Finally, install the extension rod by loosening the left screw, inserting the rod, then tightening the right screw, ensuring the counterbalance and bushing align before attaching meat forks. This systematic approach guarantees a secure, balanced rotisserie on any pellet grill. Before installation, ensure your pellet grill is properly seasoned and you have adequate fuel supply to maintain consistent heat throughout extended rotisserie cooking sessions.
Set Temperature and Rotation Speed for Perfect Results
A target grill temperature of 350 °F (±25 °F) is the sweet spot for rotisserie cooking on pellet grills, so set the controller to 350‑375 °F and let the unit preheat to about 355 °F before loading the meat. Guarantee temperature consistency by monitoring the grill thermometer and adjusting feed rate; a stable 350 °F guarantees even heat transfer. The digital controller monitors temperature via sensors to ensure precise regulation during rotisserie cooking. Next, configure rotation speed. Start the motor at a low steady RPM—typically 3–4 rev per minute—and confirm smooth motion before meat contacts the spit. Secure forks tightly, then test the system for 30‑minute intervals, watching for any wobble or drift. Maintain lid closure, keep the drip pan centered, and re‑check rotation precision every half hour to avoid localized over‑cooking. This systematic approach yields uniform browning and reliable internal doneness. Use a drip pan] to catch drippings and prevent flare‑ups.
Top Rotisserie Recipes: Chicken, Pork, Kebabs & More
Kick off your rotisserie session by selecting a recipe that matches the meat’s size and desired flavor profile, then follow a systematic sequence of preparation, seasoning, and cooking steps to guarantee consistent results. For chicken, coat a 4‑5 lb whole bird with oil, rub the detailed spice blend, stuff lemon and onion, and rotate at 350 °F for 2–2.5 h until 165 °F. Use a brined quarter with spicy SPG for a quicker 1.5‑h cook. Prime rib demands trussing, a mesquite‑peppercorn‑herb rub, garlic‑butter basting, and a smoke‑then‑sear phase. Pork options—bourbon‑orange jelly glaze on rib roast or a Parmesan‑crusted picanha—benefit from the slow roast method to retain moisture. Kebabs fit a rotisserie basket; combine poultry pieces with potatoes, onions, and lemon, letting drippings coat vegetables. Like smoking methods that rely on probe thermometers to track doneness accurately, rotisserie cooking benefits from precise temperature monitoring to ensure meat is cooked to the desired internal temperature. Essential rotisserie accessories include sturdy forks, a balanced spit, and a drip pan for clean, consistent results. Purchase a Pellet Grill and a Green Mountain Rotisserie Kit to get started.
Troubleshoot Common Rotisserie Issues
If your rotisserie stalls, overheats, or produces uneven cooking, the root cause usually lies in one of four areas—motor performance, load balance, pellet feeding, or temperature regulation—and addressing each systematically will restore reliable operation. Inspect the motor first: check alignment, verify voltage, tighten cords, and guarantee the motor sits outside the grill’s heat plume. If grinding or loss of torque occurs, weigh motor overhaul considerations such as bearing replacement or winding checks. Next, perform balanced load adjustments; distribute food evenly, add counterweights, and secure spit forks to prevent shifting. Examine pellet feed for dampness, blockages, or low‑quality feed that can disrupt the auger. Finally, clean RTD probes, clear vents, and remove ash to stabilize temperature readings. This methodical approach isolates faults and restores consistent rotisserie performance. Regular cleaning of the grill’s air vents prevents debris from blocking airflow and helps maintain even heat distribution. To extend your rotisserie’s lifespan and ensure optimal cooking results, incorporate regular maintenance into your routine after each use.
How to Keep Your Pellet Grill Rotisserie Running Smoothly
Regularly cleaning and inspecting each component of your pellet‑grill rotisserie guarantees smooth operation and safeguards against costly downtime. Follow a strict maintenance schedule: empty the hopper every 4‑5 bags, vacuum the firepot after five uses, and wipe the temperature sensor each time you cook. Burn off grease at the highest temperature for 10‑15 minutes, then scrub grates and vacuum interior ash. Check the grease cup and drip tray after every session; clean the tray every 3‑5 uses and replace foil every 4‑5 cooks. Perform a deep clean after 18‑20 cooking hours, and run a 400°F burn‑off for 15 minutes before each detailed cleaning. For stubborn grease buildup, create a baking soda and vinegar paste to break down tough residue on interior surfaces before vacuuming. Effective pellet storage management—keeping pellets dry, sealed, and free of dust—reduces blockages and secures consistent feed, extending rotisserie life. Brush off cooking grate buildup after each use to prevent residue accumulation.