On a charcoal grill, the crust forms through direct conduction: the hot coals heat the cast‑iron grate, which then transfers heat straight into the patty’s surface, triggering the Maillard reaction in seconds. Keep the patty dry, press it thin on the pre‑heated grate, and let the heat melt intramuscular fat for juiciness. After a quick sear, move the burger to the cooler side to finish cooking without drying out. If you follow these steps, you’ll uncover even more tricks for mastering the perfect burger.
Why a Hot Sear Gives Your Charcoal Grill Burger a Perfect Crust
When you crank the grill to 400‑450 °F, the Maillard reaction ignites, turning the patty’s surface into a deep, caramelized crust. You must keep the meat dry; any surface moisture dilutes amino acids and sugars, slowing the reaction. Pat a patty on a pre‑heated cast‑iron or grill grate, press it thin, and let the heat evaporate remaining water instantly. This creates a concentrated reactant layer that browns in seconds. Simultaneously, the high temperature melts intramuscular fat, allowing fat rendering optimization that juices the interior while the exterior stays crisp. Using a digital meat thermometer helps you monitor the internal temperature to ensure your burger reaches the perfect doneness while maintaining that juicy center. Mastering time‑temp balancing guarantees the crust forms without overcooking the middle, delivering a perfect, flavorful bite every time. The Maillard reaction is crucial for achieving the perfect sear on a burger.
Two‑Zone Charcoal Grill Setup for a Strong Maillard Sear
A strong Maillard crust needs a dedicated hot zone, so set up your charcoal grill with two distinct temperature areas. Fill a chimney halfway with 45 unlit briquettes, light 12‑15 until they turn white, then dump them on one side of the grill. Rake the lit coals into a one‑third‑wide block to create a direct‑heat zone that reaches 450‑550°F. Bank the remaining charcoal on the opposite side, leaving a cooler indirect zone at 250‑350°F. Open the bottom vents fully and position the top vents over the cool side to channel smoke and direct heat. The hot zone delivers radiant heat transfer for a sear, while the grill’s metal conducts the heat into the patty, forming a deep crust. After a brief sear, move burgers to the indirect side to finish cooking without flare‑ups. Using a meat thermometer ensures your burgers reach the safe internal temperature while maintaining the juiciness achieved through proper heat management. Ensure that the airflow is balanced to keep the temperature stable throughout the cook. The indirect zone also helps prevent excessive heat buildup on the meat, preserving juiciness.

【Master Two-Zone & Indirect Cooking】 Designed in a perfect half-moon shape, this charcoal basket fits snugly against the side of your kettle grill. It instantly creates a dedicated "Hot Zone" for searing and a "Cool Zone" for slow roasting or keeping food warm. This setup is essential for cooking ribs, whole chickens, or pork butts without burning, giving you restaurant-quality results.
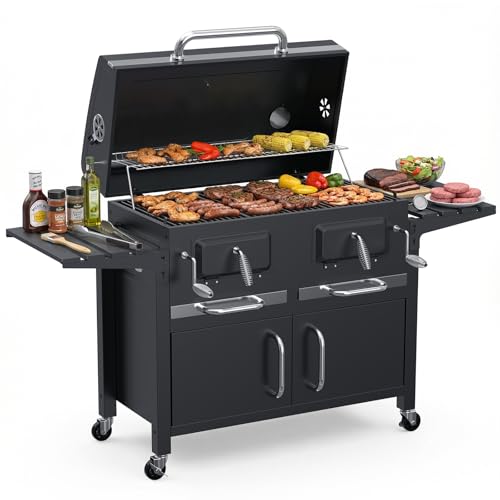
EXTRA LARGE CAPACITY FOR BACKYARD FEASTS: Feeding a crowd of 15+ has never been easier. This oversized charcoal grill features a heavy-duty main cooking grate and an elevated warming rack, providing a sprawling surface for steaks, burgers, and ribs. Whether you are looking for charcoal grills on clearance or a premium barbecue grill, our station delivers the space of a professional outside grill.
Direct vs. Indirect Heat on a Charcoal Grill: What It Means for Juiciness?
Because direct heat sears the exterior in seconds, it can lock in flavor but also risks drying thin burgers if you linger too long; indirect heat, by contrast, cooks more slowly and evenly, preserving internal moisture while still allowing a modest crust. When you place a patty over hot coals, the radiant flame delivers an ideal searing technique that creates Maillard browning and grill marks, but the intense temperature can evaporate juices from a ¾‑inch burger in under three minutes. Shifting the burger to a cooler zone creates a uniform temperature distribution, letting convection finish the cook without over‑drying. Use a two‑zone setup to start by searing direct for two minutes, then move indirect to maintain moisture, achieve even doneness, and retain juiciness. After cooking, allow the burger to rest for a few minutes to let juices redistribute before serving. Direct heat is especially effective for creating golden‑brown color on the exterior.

Extra-Large Capacity: Featuring 780 sq.in. total grilling space (500 sq.in. primary grilling area + 280 sq.in. warming area), this charcoal BBQ grill lets you cook multiple...
Common Charcoal Grill Sear Mistakes (and How to Fix Them)
Three common searing mistakes can ruin a charcoal‑grilled burger, but each has a simple fix: don’t press the patty, manage flare‑ups, and avoid uneven heat. First, keep the spatula off the burger during the initial 3‑4 minutes; pressing squeezes out juices and leaves the patty dry. Let it sear undisturbed for a crisp crust. Second, control flare‑ups by trimming excess fat and moving the burger to an indirect zone as soon as flames lick the surface; rotate the grate instead of the patty to keep the grill’s even cooking temperature. Third, prevent uneven searing by arranging a two‑zone setup with hot and cool areas, then swap burgers between zones until each side reaches the same doneness. Maintain an adequate fuel supply and preheat the grill to 450‑500°F for consistent performance. Before cooking, ensure proper airflow by fully opening your grill vents to maintain steady heat throughout the sear. Charcoal provides higher peak temperatures that enable a rapid sear and a flavorful crust.
Charcoal Grill Meat Thermometer Guide for Perfect Doneness
When you master a thermometer, you eliminate guesswork and lock in perfect doneness every time you fire up the charcoal grill. Choose an instant‑read model for quick 0.5‑4‑second readings and a 4.3‑inch probe that reaches the thickest part of the meat. Insert the probe away from bone, centering it in the bulk of the patty or steak—this guarantees probe placement that reflects true internal temperature. For multi‑probe or wireless setups, monitor both meat and grill ambient temps, keeping the lid closed after insertion to avoid heat loss. Look for thermometers with a temperature range wide enough to handle both low smoking temperatures and high searing heat. Calibrate regularly to maintain probe accuracy within 1‑2 °F. Track target temps—125 °F for rare beef, 135 °F medium‑rare, 145 °F medium, 165 °F poultry—to achieve consistent, safe doneness. Investing in a high‑quality thermometer prevents undercooking and reduces food waste.

2.0 inches large auto-rotating backlit display: Digital food thermometer has a 180° auto-rotating backlit display, making this kitchen thermometer perfect for left-hand users and allows you to use it in low light conditions

【8X Faster + 4X More Precise】: Upgraded with an industrial-leading professional thermocouple sensor, Themomonster meat thermometer digital with NIST certified ±0.5℉ precision provides you the accurate temperature of your food in just 0.5 Seconds.

【Ultra-Fast & Precision Accurate】This meat thermometer digital delivers accurate readings within ±1°F/±1°C in just 2–3 seconds, with a wide temperature range of -58°F to 572°F (-50°C to 300°C). No more waiting over the heat - know your food's exact temperature instantly.
Adding Cheese on a Charcoal Grill: Timing the Final Heat Transfer
How do you perfect the final heat transfer when adding cheese to a charcoal grill? Place a cheese block on the indirect side of the grill once the meat reaches its target temperature. Keep the grill temperature below 90 °F by closing dampers three‑quarters and adding a few wood chips for cold smoke. Smoke the cheese for 1–2 hours, flipping halfway to guarantee even smoke exposure and uniform conduction. For high‑melting cheeses like Gouda, a 1‑minute sear on each side over medium‑high heat creates a lightly charred rind while preserving creamy interior textures. Brush the cheese with oil before the brief melt to enhance heat transfer and prevent sticking. Finish by topping the burger and letting the cheese melt for 30 seconds, preserving the desired texture. Smoked cheese has a longer shelf life than non-smoked cheese due to the curing process, which also adds a subtle, smoky depth to the overall flavor profile. For optimal results, store any leftover smoked cheese in an airtight container to maintain its quality and prevent it from drying out.
Frequently Asked Questions About Charcoal Grill Burger Conduction
After mastering cheese placement, the next step is understanding how conduction shapes your burger’s crust. Conduction occurs when the patty contacts the hot grates, transferring heat directly and creating the sear you want. Keep the grill at the optimum charcoal temperature—around 375‑400 °F—so the grates are hot enough for a crisp bottom without burning. You’ll sear each side for 2‑3 minutes, then flip once when juices pool. After the sear, make after sear temperature adjustments by moving the burgers to the indirect zone; close the lid and let convection finish cooking to 160 °F. For consistent heat during cooking, keep your ash catcher clean to maintain proper airflow. This two‑zone method balances direct conduction for browning and indirect convection for even doneness, preserving juiciness and flavor. Proper ventilation ensures consistent heat circulation during the convection phase.