Unplug the grill, let it cool to room temperature, then remove the cooking grates, drip pan, and RTD probe. Vacuum ash from the burn pot and interior, scrape carbonized spots with a pad‑switching scraper, and brush grates with a heat‑resistant wire brush. Soak grates in soapy water, rinse, and dry before reassembly. Line the drip tray with foil, clean the exterior with a vinegar‑water spray, and reassemble all components. Finally, run a quick 400 °F burn‑off to verify uniform heat and uncover the next steps.
Unplug, Cool, and Disassemble the Pellet Grill
Before you begin any maintenance, turn the grill off completely and unplug it from the outlet to eliminate electrical hazards. Confirm unplugging safety by verifying the power cord is disconnected and the outlet shows no voltage. Let the unit cool until all surfaces are room‑temperature; this prevents burns and guarantees grill accessibility for the next steps. Lift the cooking grates, then remove the drip pan and RTD probe, clearing the interior. Disconnect the RTD probe from its controller, then unscrew the controller housing. Slide out the burner assembly after removing the four wall screws—two positioned three‑quarters down, two beneath the shelf. Finally, detach the hopper by removing its access panel screws and routing any remaining wires. Regular cleaning schedules will help prevent grease fires and maintain consistent cooking quality. This systematic approach readies the grill for deep cleaning. Remove the grill grates and drip pan before cleaning.
Gather the Right Tools: Shop Vac, Scraper, Wire Brush, Degreaser
When you’re ready to tackle the grill’s interior, start by assembling the essential tools: a shop‑vac for ash and debris, a scraper for stubborn residue, a wire brush for grates, and a degreaser for grease. Use the shop‑vac to extract loose ash from the burn pot and interior cavity, pairing it with a dustpan for an all-encompassing approach. Select a scraper with interchangeable pads to target carbonized spots without damaging metal surfaces. Apply a soft‑touch wire brush, or a dual‑purpose brush‑scraper, to scrub grates while they remain in place, ensuring efficient maintenance of the cooking surface. Finally, spray a pellet‑specific degreaser, allow a one‑minute dwell, then wipe clean and rinse with mild detergent to eliminate chemical residue. Regular maintenance helps avoid buildup of food residue, grease, and rust, extending your grill’s lifespan and ensuring better cooking results. The kit also includes a wide stainless steel scraper for cleaning large heat plates.

【Efficient BBQ Grill Brush】: Our Pepeng grill cleaner brush for outdoor grill is specially crafted, the moderately stiff grill cleaning brush can effectively remove stubborn residue and grease from your grill but without damaging the surface, making it look brand new after every use.

Powerful, fast-acting formula

Complete cleaning kit to give your Traeger a deep clean
Clean Pellet Grill Grates – Hot‑Brush, Soak, and Rinse
A few minutes after you finish cooking, you can tackle the grates while they’re still hot, using a long‑handled brush or scraper and oven mitts to protect your hands. First, brush each grate with a stiff, heat‑resistant brush, applying firm, linear strokes to dislodge softened residue. Next, remove the grates and place them in a container filled with cold water and a few drops of dish soap; let them cold soak for ten minutes, allowing the detergent to break down remaining gunk. After the soak, use a nylon scrub brush to scrub any stubborn particles, then rinse thoroughly with a garden hose. For rapid routine maintenance, perform a steam clean by pouring ice water onto the hot grates; the resulting steam loosens debris without damaging coatings. Finish by drying the grates with a clean cloth before reassembly. Brush the grill grates before each cooking session to remove stuck‑on food. Once your grates are clean and dry, consider seasoning them with high-temperature cooking oils to protect against rust and maintain optimal performance.

BRISTLE-FREE GRILL BRUSH FOR SAFE CLEANING: Keep your family safe with our bristle-free grill brush! Unlike traditional wire brushes, there are no dangerous bristles to break off and end up in your food. Grill Rescue's BBQ cleaning brush is a safer alternative for gas, charcoal, porcelain, ceramic, cast iron, and stainless steel grates.

Extra Strong Ergonomic Handle - Still believe that as long as the bristles are stiff enough, the grill cleaning brush can live up to the name - a good barbecue brush? Of course not! A soft and sturdy handle with a stainless steel ring for hanging can make the clean work easier. No possibility such as the handle breaking up or snapped. You can succeed in using this BBQ cleaner for a very long time!

Is Your Grill Brush Safe? - With all the concern about metal wire bristles, we decided to develop a safe grill brush that leaves your grill clean and free of metal wire bristles.
Prevent Grease Buildup on Grates After Cleaning
After you’ve scrubbed the hot grates and rinsed them clean, the next step is to stop grease from re‑accumulating. First, line the drip tray with a fresh sheet of aluminum foil or a manufacturer‑approved liner; replace it when it reaches two‑thirds full to prevent hot grate residue from seeping into the tray. Second, trim excess fat from meats and choose lean cuts or vegetables, which reduces drip volume and helps you avoid grease carryover onto the grates. Third, after each cook, run a burn‑off cycle at the highest temperature for 10‑15 minutes, then apply a thin coat of high‑smoke‑point oil and run the grill at 500 °F for 1.5 hours to seal the seasoning. Finally, inspect the undersides of the grates before each session; any residual film should be scraped away immediately to maintain a clean cooking surface. For stubborn buildup on grates, consider making a baking soda and vinegar paste to break down tough grime before wiping clean. Deep Clean should be performed every few months to remove buildup from the heat deflector and chamber walls.
Vacuum Pellet Grill Firepot, Barrel, and Interior Ashes
If you’ve just finished a cooking session, the next step is to clear the firepot, barrel, and interior of ash before the grill cools completely. Begin with firepot inspection: wear eye protection, insert a narrow bottle brush or stiff wire hook through the burner tube, then use a shop vacuum to extract ash from the visible auger area. Add a handful of pellets to facilitate the next startup. Remove grates and heat baffles, brush loose ash from the barrel with a paintbrush, and vacuum the interior, focusing on the heat deflector plate above the firepot. Scrape grease, then vacuum the surrounding chamber. Finally, remove the heat‑baffle cover, vacuum interior ashes, check vent holes and igniter for blockages, and run the grill at 350‑400 °F for 15‑20 minutes to burn off residues, which helps eliminate manufacturing residues similar to the initial seasoning process. This routine satisfies barrel maintenance and promotes optimal performance. Also, clean the hopper every 100 hours to prevent dust buildup.

FROM MESSY to EFFORTLESS-- Stop dealing with dusty, back-breaking cleanup. The Stanley Ash Vacuum offers a dust-free and NEW highly efficient solution for your workshop
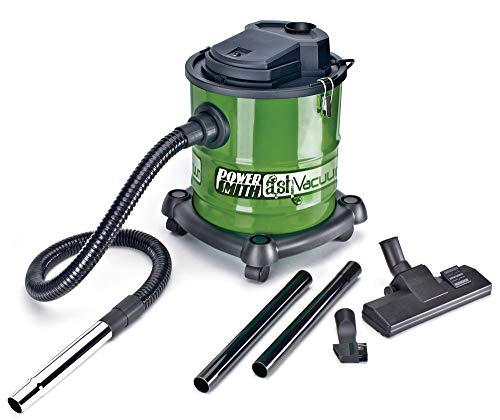
Specifically designed to clean warm and cool ash out of fireplaces, wood stoves, pellet stoves, and barbeque grills

【Efficient Suction Without Clogging】 Powered by a 4 HP motor, this ash vacuum delivers robust suction to efficiently remove stubborn ash, soot, and debris. Say goodbye to the hassle of cleaning with a shovel manually—this vacuum ensures a tidy and effortless cleaning experience. The reusable accessories make it an economical choice for pellet stoves
Degrease Pellet Grill Drip Tray and Grease Bucket
The grease‑drip system—comprising the tray, drain tube, and bucket—must be cleared before any residual oil can cause flare‑ups or clog ventilation. First, turn the grill off, let it cool, then run it at 400 °F for 15 minutes to burn off remaining pellets. Remove grates, scrape the tray and drain tube with a plastic scraper, and apply foaming degreaser. Let it soak several minutes, then scrub with a nylon brush or scouring pad until the buildup loosens. Wipe the tray, back wall, and interior with soft rags, followed by a damp cloth to remove residue. Dry thoroughly. For the bucket, use paper towels to wipe, then employ grease bucket cleaning methods such as foil liners or commercial liners to prevent grease buildup. Regular cleaning of the grease‑drip system ensures proper temperature control by maintaining airflow.
Vacuum Pellet Grill Auger Tube and Clear Sawdust
You’ll want to clear the auger tube and remove any sawdust before the next cooking session to prevent jams and maintain consistent pellet feed. First, disconnect power and remove the hopper access panel. Disconnect the auger motor shaft, then use channel locks to turn the auger counter‑clockwise while wiggling side‑to‑side, loosening compacted pellets. Deploy a shop vac immediately as the auger exits, directing suction at the firepot, shaft opening, and hopper interior to capture falling pellets, sawdust, and ash. After removal, insert a wooden stick or the auger itself to scrape any remaining moisture‑saturated pellet dust from the tube. Verify the tube is empty, then reassemble, run a five‑minute burn‑off cycle, and perform an auger test to confirm auger jam prevention and pellet quality control. Dry pellets are essential to avoid future blockages. This maintenance routine aligns with the precise temperature control that pellet grills are known for, as a clean auger system ensures consistent heat delivery and optimal cooking performance.
Wipe Down Pellet Grill Exterior and Hopper
When the grill has cooled and is unplugged, mix equal parts vinegar and water in a spray bottle, then mist the lid, side tables, and stainless‑steel panels; let the solution sit a minute before wiping with a lint‑free cloth to dissolve grime and prevent residue buildup. Next, use a soft, damp cloth with a drop of mild dish soap to wipe down stainless steel surfaces, ensuring no streaks remain. For the hopper, remove any loose pellets, then vacuum the interior to clear hopper debris and dust. Follow with a lint‑free cloth dampened in the vinegar solution to wipe the hopper exterior, paying attention to seams and the honeycomb plate if present. Finally, dry all components with a clean microfiber towel to avoid water spots and prepare the grill for reassembly. Empty the pellet hopper after each cook to maintain optimal performance.
Reassemble Pellet Grill and Run a Quick Burn‑Off Test
After confirming every component is completely clean and dry, start reassembling the grill in the prescribed order: place the heat diffuser or deflector beneath the temperature probe, secure the burn pot, align the drip tray and cooking grates on their supports, then reattach the hopper lid and fill it with pellets before closing the lid fully. Verify proper component alignment at each step; any mis‑fit can cause uneven heating. Guarantee complete drying before reassembly, especially around the auger and fire pot, to prevent ash accumulation. Once sealed, prime the auger by setting the grill to smoke, holding the prime button until pellets trickle into the fire pot. Then initiate a quick burn‑off: raise temperature to 400 °F, run for 30 minutes, and monitor for steady flame and uniform heat across the grates. Check the auger tube orientation to ensure proper grease drainage. For optimal grill functionality and hygiene, consider using mild detergents and careful handling when cleaning any remaining residue from internal components before your next cooking session.
Troubleshoot Pellet Grill Smoke, Stubborn Grease, and Odor
If smoke billows, grease clings, or odd odors linger, the culprit is usually blocked airflow, residual ash, or moisture‑laden pellets. First, remove the fire pot and vacuum all ash; a shop vac clears fine particles that choke the igniter. Next, inspect vent holes and the exhaust pipe; perform exhaust pipe cleaning with a brush to restore proper draft. Check the hopper for damp wood; freshen wood pellets by heating them to 400 °F for 15 minutes before reloading. Different wood pellet flavors can impact smoke quality and should be selected based on your cooking preferences. For grease, apply a citrus degreaser, let it sit 30 seconds, then scrape with a plastic scraper and brush chamber walls. Wipe stainless steel with a damp cloth, following the grain, and vacuum remaining residue. Finally, scrub the smokestack interior, clean the chimney cap, and wipe the chamber to eliminate lingering odor. Burn off pellets at 400°F for 15 minutes before reloading.