Turn off the grill by closing all knobs and dials, then confirm no flame or heat remains; keep the work area clear of flammable objects and guarantee good ventilation. Close the propane tank valve by turning the handwheel clockwise until it locks, feeling for resistance and listening for no hissing. Disconnect the regulator by loosening the hose coupling nut counter‑clockwise, using a wrench if needed, and inspect the hose and regulator for damage. Loosen any restraining bolts, lift the cylinder upright, and place it on a stable, non‑flammable surface in a ventilated vehicle. Follow these steps and you’ll be ready for the next safety checks.
Turn Off the Grill and Make the Work Area Safe
Before you touch the tank, make sure the grill is completely off and the work area is safe. Turn every knob, handle, and dial to its fully closed, off position. Double‑check control settings to prevent accidental ignition. Confirm burner operation has ceased; there should be no flame, heat, or residual gas venting. Position the grill where you can reach the cylinder without obstruction. Clear flammable objects, guarantee adequate ventilation, and avoid enclosed spaces. Secure the grill upright to stop rolling, and keep tools or rags nearby for any minor propane release. Verify no ignition sources are present, then proceed to locate the propane cylinder and prepare for regulator detachment. Keep the grill in a well-ventilated outdoor space to ensure safe handling of the propane tank. Close the tank valve before any further disassembly.
Close the Propane Tank Valve Completely
Now that the grill is off and the area is secure, locate the tank’s main valve on the top of the cylinder and turn the handwheel clockwise until you feel firm resistance. Apply steady pressure, allowing the ease of valve motion to guide you, and stop when the handwheel meets firm resistance. This action guarantees the prevention of over tightening, which could damage the valve stem or seal. Verify closure by feeling the wheel lock against the tank body and listening for the absence of hissing. Attempt a slight additional turn; the wheel should not move, confirming a full seal. Record the valve position as perpendicular to the flow direction, indicating complete shutoff before any further disconnection steps. Keep a fire extinguisher nearby during propane tank disconnection for quick response in case of emergency. Ensure all safety precautions are observed before beginning the disconnection.
Disconnect the Pressure Regulator From the Tank
If the grill is off and the tank valve is fully closed, you can safely detach the pressure regulator. First, verify the tank valve is fully closed and the grill burners are off; work in a well‑ventilated outdoor area while wearing protective gloves. Inspect the regulator for cracks, corrosion, or worn seals—these are the regulator inspection details you must record. Examine the hose for splits, kinks, or brittle sections; hose condition considerations dictate that any compromised hose be replaced before reassembly. Grip the regulator firmly, turn the hose coupling nut counter‑clockwise, and twist the threaded regulator off the tank slowly to release residual pressure. If the fitting resists, apply penetrating oil and use a wrench, avoiding cross‑threading. Once removed, store the regulator dry and upright. Securely transport the tank upright in a well‑ventilated location, ensuring proper maintenance and storage practices are followed to extend tank life and maintain safety.

SIZE - QCC propane gas cylinder adapter, 3/8″ female flare fitting, 5/16" diameter hose, 2 feet length for more flexible use

Equipped with Extra Propane Tank Gauge, Save Your Money. The built-in tank gauge saves your money and time. The 3 different colors dial of the tank gauge level indicator allows you to read and monitor the gas level without necessarily removing from the tank and detect the leaks to ensure your safety.
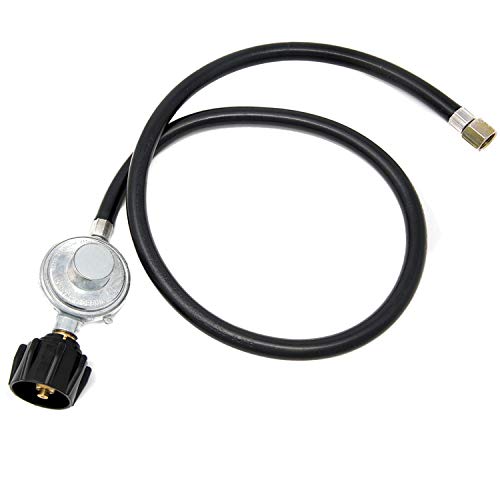
A TOP QUALITY PROPANE REGULATOR AND HOSE - maxing out at 80, 000 BTU, this 3Ft low pressure propane regulator is fiber reinforced to ensure quality performance. The hose is the perfect fit for a wide variety of grills, fire pit tables, and other propane appliances
Loosen Restraint Bolts and Remove the Propane Cylinder
Loosen the restraining bolt by turning it counter‑clockwise with the appropriate wrench or screwdriver, then support the cylinder and lift it straight up while keeping it upright. Verify the grill is off and the valve is closed clockwise before you begin. Inspect the bolt and surrounding metal for rust or corrosion; record any safety inspection details. Use a correctly sized wrench to avoid stripping the head, and keep the cylinder’s weight balanced while you turn. Once the bolt releases, clear the area of obstacles, then grasp the cylinder’s base and raise it vertically, maintaining proper tank storage orientation. Do not tip or drop the tank; any damage observed during removal must be logged and the cylinder retired. Ensure the tank valve is fully closed before loosening the restraining bolt. Proper pressure output regulation depends on maintaining the integrity of both the valve and regulator during removal.

【TIME-SAVING VALVE OPERATION】 The innovative gear design maximizes friction to facilitate smooth turning of propane valves, allowing you to complete your work quickly and effectively.

Eight-lobe design provides a secure grip on QCC1 nuts.
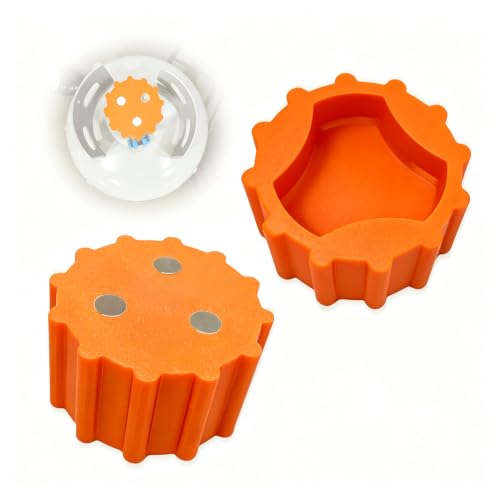
Opens Stubborn Valves Fast – Get leverage to turn stiff propane tank handles in seconds on RVs, BBQ grills, patio heaters, and more. Designed to fit standard OPD (Overfill Prevention Device) valve handles
Place the Tank Upright in a Ventilated Vehicle Position
After you’ve removed the cylinder, place it upright on a flat, non‑flammable surface inside the vehicle, guaranteeing the valve remains closed and the tank’s base is supported by a sturdy foot‑base or milk crate. Verify that the location satisfies stable surface placement: a level concrete pad or asphalt floor, away from direct sunlight and heat sources. Maintain the required distance from hazards—at least ten feet from flammable materials, windows, and air intakes, and five feet from any crawl‑space openings. Ensure the vehicle is ventilated; open a window or vent to allow propane vapor, which is heavier than air, to disperse safely. Follow OSHA mandates for upright storage and ventilation to prevent vapor pooling, pressure‑relief valve malfunction, and ignition risk during transport. Before transport, check your propane tank levels to confirm you’re moving a safe quantity of fuel. Store the tank outdoors in a well‑ventilated area to reduce leak hazards.
Reconnect the Regulator and Perform a Leak Test
One you’ve secured the tank upright, tighten the regulator coupling nut clockwise until it’s hand‑tight—no more, no less—while keeping all burner knobs in the off position. Wait 30 seconds to let pressure equalize, then open the tank valve slowly in quarter‑inch increments, watching for any gas escape. Follow the regulator reconnection steps: align the hose, confirm no cracks, and verify the gauge reads within the manufacturer’s range. Apply a soapy‑water solution to the regulator, hose, and fittings; bubbles indicate a leak, prompting immediate shut‑off and reseating. If no bubbles appear, use an electronic detector for a second check. Conduct a post leak test inspection, confirming all connections are sealed before igniting any burner. For added safety, wear grill mitts while handling connections to protect your hands during the reconnection process. Proper ventilation is essential during the entire process to prevent gas accumulation.

Compatible with all appliances featuring a QCC1 / Type 1 connection, this gauge is suitable for propane tanks ranging from 5 lb to 40 lb. Note: This product is not suitable for propane tanks exceeding 40 lb

Set of 2. Compatible with all appliances with a QCC1 / type1 connection and up 5 lb to 40 lb propane tanks.
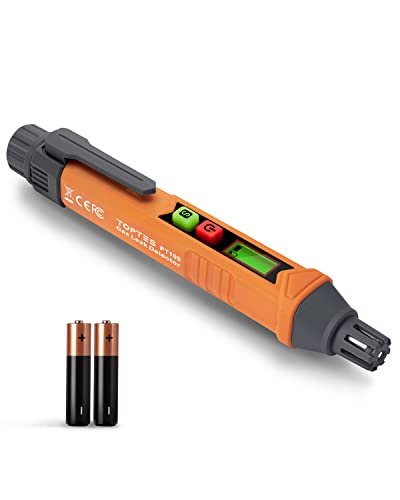
Combustible Gas Leak Detector: The TopTes PT199 detects natural gas, methane, propane, butane, LPG, and more, pinpointing leaks to reduce the risk of explosion, keeping your family and property safe
Verify Tank Certification Before Refilling
Before you ever start a refill, make sure the tank’s certification is current; the manufacture date stamped on the collar (MM‑YY) tells you whether the 12‑year DOT deadline has passed, and the recertification stamp—letter A‑D plus a two‑digit year—shows the most recent inspection method and its validity period. Check the collar for the visual inspection code (A‑D) and the year to confirm the method—external visual, proof‑pressure, or volumetric expansion—matches its allowed interval (5‑12 years). If the stamp is older than the permitted window, you must renew tank certification before any fill. Do not attempt to repurpose expired tank; DOT rules require a certified dealer to perform the appropriate test and issue a new stamp before you can legally refill. Propane refill stations will not fill a cylinder that is 12+ years old without recertification. Proper tank maintenance and storage practices also ensure that your grill tank remains safe and reliable for years of use.