First, fill the hopper to at least the safety‑grate minimum, then close the lid and flip the auger‑box power switch ON. Plug the grill into a grounded outlet, press the front power button, and tap the selection dial to wake the display. Choose Smoke on the controller; the auger will feed a few pellets while the heating rod ignites. Wait for the white smoke to clear and the ready light to glow, then set your desired temperature. Continue for deeper details on fine‑tuning and troubleshooting.
Fill Hopper & Inspect Core Parts
Before you fire up the grill, open the hopper lid, locate the safety grate, and fill the hopper to at least that level, then close the lid securely. Use proper pellet storage to keep pellets dry and free of contaminants. Pour Traeger hardwood pellets directly into the hopper, ensuring you meet the safety‑grate minimum for a timely hopper refill. After filling, inspect the core parts: check the porcelain‑coated grates for cracks, verify the grease drain pan and heat baffle are clean, and confirm the firepot is unobstructed. Look at the draft inducer fan to see it’s moving air and make sure the hot rod reaches a red glow without touching anything. For best results, consider seasoning the grates periodically to maintain their performance and longevity. These steps guarantee a clean feed path and ready ignition. Also, ensure the switch is off before beginning any inspection.

PRECISE DIMENSIONS: Measures 21 ¾" x 19 ½" x ½" for Traeger Pro 575
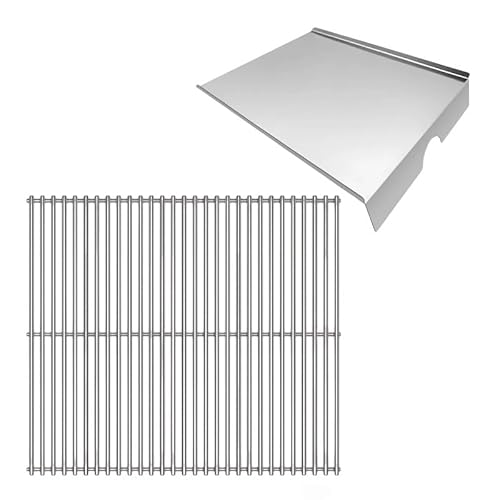
COMPATIBILITY: Designed specifically as replacement cooking grates for Traeger Pro 575 and Pro 22 models, Fit for Traeger 22 Series grill models,Fit For Pellet Smoker Grill models (BAC012, BCA070, BBQ07C, BBQ07E, BAC507),ensuring a perfect fit for your grill
Power On the Pellet Grill & Wake Display
Now that the hopper is full and the core parts are inspected, plug the grill into a grounded outlet, confirm the lid is closed, and flip the auger‑box power switch to ON. The front power button lights the digital controller; tap the selection dial to wake the display. After a few seconds, a splash screen appears, then three dashes and “F” or “C” signal the home screen. Verify the Traeger logo shows, certifying the controller has power. If you lack a wall outlet, consider alternative power options like a Goal Zero or Jackery battery pack, but guarantee voltage matches the grill’s requirements. Keep the grounded outlet necessity in mind throughout cooking; the controller must stay powered for temperature regulation. Position your grill away from flammable materials to ensure safe operation in your outdoor space. Outdoor extension cords can also be used if the outlet is not nearby.
Select SMOKE for Pellet Grill Ignition
Select the Smoke setting on the controller to start the grill’s ignition sequence. The Smoke mode primes the auger, feeding a small pellet amount while the heating rod ignites the fire pot. You’ll see thick white smoke production; this phase is purely for ignition, not cooking. The auger cycles 15 seconds on, 65 seconds off, keeping temperature around 150‑200°F. Stay patient—no temperature control exists, and the grill will stay in this low‑heat range for about two minutes. Once the white smoke clears, the grill has successfully ignited. Before your first cook, properly season the grill by running it through a complete ignition cycle to burn off manufacturing residues. Remember, pellet grill smoke settings like Smoke are only for startup; avoid adding food until you switch to a cooking mode. The Smoke setting cycles the auger on for 15 seconds, then off for 65 seconds.

Compatible replacement part: Designed for selected Traeger wood pellet grill models and compatible as a replacement for controller item BAC236 and model AH-038-F

Precise Temperature Control: Our PID (Proportional-Integral-Derivative) algorithm ensures that you can set your grill's temperature with unparalleled precision. Whether you're smoking, roasting, or grilling, maintain your desired temperature in 5° increments as low as 100°F to as high as 450°F. Additional ventalation and airflow may be necessary to maintain temperatures lower than 200°F, especially on smaller size grills.

【VERIFY FIT BEFORE ORDERING】Replaces BAC236/BAC365 on select Traeger pellet grills, including Pro 20/22/34, Texas Elite 34, Lil Tex 22, Junior, Tailgater, Ridgeland, Heartland, Mesa 22, Century 22, Silverton 2019 and Bronson. Match the original part number, wiring and connectors before ordering.
Close Lid & Preheat Pellet Grill to Ready Light
Once the flame is steady and the smoke turns whitish‑gray, close the lid and let the grill preheat until the ready light comes on—typically 10–15 minutes for most models, though Pro Series units may need only a couple of minutes. Guarantee the firepot flame roars and the smoke stays steady before sealing the lid. Keep the grill clean; a good cleanliness factor prevents pellet clogs that could delay the ready light. Regular cleaning schedules help maintain consistent performance and prevent buildup that interferes with ignition. Be aware of weather impact—wind or cold air can extend preheat time, so allow a few extra minutes if conditions are harsh. Do not open the lid during this phase; opening disrupts the heat cycle and can cause temperature swings. When the ready light illuminates, the grill has reached a stable temperature and is prepared for cooking. Correct ignition ensures the flame stabilizes quickly.

✅[ Easy Temperature Reading ] - 3 3/16'' Large Dial BBQ Grill Smoker Thermometer with enlarged degree scales and numbers , easy to read even from far away. Perfectly fits for most smokers or grills with a 3/8 inch opening or hole

Precision Fit: Grill Temperature Probe Designed specifically for Z-Grill 700 Series pellet grills, this split RTD probe (ZG-RTD-2) is fully compatible with models 700C, 700D6, 7002B, 7002E, 700D, and 700E, precisely restoring the performance of the temperature control system

【500FT Remote Temperature Monitor & Smart Alerts】Equipped with Bluetooth 5.0, this bluetooth grill thermometer transmits real-time grill temperature data to the TempPro App within 500 feet; customize high/low temperature thresholds, and instant alerts will be pushed to your smart phone once the temperature deviates from your preset range, saving you from constantly hovering beside the grill
Set Desired Cooking Temperature After Preheat
After the grill’s ready light turns on, set your desired cooking temperature on the controller and then fine‑tune the P‑Setting to keep that temperature steady. Use the controller’s temperature dial to choose the cooking level, then locate the tiny hole on the front panel. Insert a paperclip and press to change the P‑Setting. Follow these P setting adjustment recommendations: if the grill runs hotter than your target, increase the setting by one (e.g., from P‑3 to P‑4); if it runs colder, decrease it by one. Apply adjustments only after the grill reaches the set temperature. Employ temperature stabilization techniques such as monitoring ambient conditions and wind; lower the P‑Setting in cold or windy weather to maintain heat, and raise it in hot conditions to avoid overheating. This fine‑tuning keeps the grill steady throughout the cook. The p‑setting is accessed on the controller in the upper right corner. To maintain optimal grill performance over time, periodically perform grill maintenance such as vacuuming the firepot and removing sawdust buildup.
Check Pellet Feed, Fan & Probe Readiness
Before you fire up your Traeger, make certain the pellet hopper is full of 100 % natural Traeger hardwood pellets, the lid closes tightly, and the auger, hot‑rod ignition, induction fan, and temperature probe are all primed and communicating—this guarantees a steady flame, proper airflow, and accurate temperature control right from the start. Press UP + IGNITE until “PRI” flashes, then wait two minutes for the auger to fill the fire pot. Verify pellet flow quality by listening for steady drops and watching the fire pot glow. Check ignition element monitoring: the hot rod should hit red‑hot within four minutes, drawing ~300 W. Confirm the induction fan runs at ~50 W and circulates air evenly. Finally, verify the temperature probe reports a stable reading to the controller. Traeger’s wood pellets for grilling are produced in multiple USA facilities, ensuring quality fuel for your grill. The grill’s temperature range of 150 to 450 degrees enables both low‑and‑slow smoking and high‑heat searing.
Troubleshoot Common Pellet Grill Startup Issues
Even with a full hopper and primed components, a Traeger can still refuse to ignite if something goes wrong during startup. First, check the hot rod: remove the grate, drip tray, and heat baffle, set the grill to smoke mode, and look for frayed wires or damaged connectors. Replace any bad parts or contact Traeger support. Next, inspect the induction fan beneath the hopper; clear dust, spin the fan manually, and use zip ties for wire snagging prevention to maintain the orange wire clear. Then, examine the auger. Remove standard components, verify pellet flow, and run the grill on high with the lid open to charge the auger. Schedule regular auger cleaning intervals to avoid jams. Finally, follow the correct startup sequence—closed‑lid for two minutes or open‑lid until whitish‑gray smoke appears—to guarantee reliable ignition. The temperature sensor plays a critical role in monitoring your grill’s internal heat levels during this startup phase. Ensure the grill is plugged in before beginning the process.


