Light a chimney starter, fill it just below the top with self‑igniting briquettes, and let the coals ash over for 15‑20 minutes. Spread a single layer for rapid searing, pile one side for a two‑zone setup, or use three piles for a central indirect zone. Preheat the grill to 450‑550 °F, oil the grates, then sear meat directly over a hot mound for 60 seconds per side. Finish thick cuts indirectly, monitoring a probe and adjusting vents. Keep the lid closed to maintain heat, and you’ll uncover deeper techniques ahead.
Gather & Light Charcoal Efficiently
Three steps make lighting charcoal a breeze: clear the grill, stack the fuel, and ignite with the right tool. You start by removing the top grate and opening the bottom vent fully, ensuring maximum airflow. Fill a chimney starter with self‑igniting charcoal briquettes just below the top, then place it on the charcoal grate over crumpled newspaper or lighter cubes. Light the starter material and wait 15‑20 minutes until the coals ash over and flames appear on the top. Using tongs, pour the hot coals onto the grill and evenly distribute lit coals across the surface. This method delivers rapid, chemical‑free ignition, consistent heat, and a clean flavor foundation for any cooking zone. If you don’t have a chimney starter available, you can arrange charcoal in small piles over fire starters positioned just under the top charcoal layer for optimal oxygen flow. Check the propane tank connection before lighting a gas grill to ensure safety.
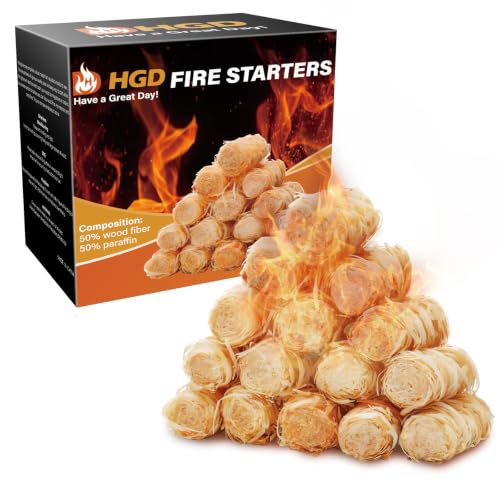
Safe & Waterproof: The fire starter is made with natural wood shavings which are safe, nontoxic and efficient without any harmful substances and waterproof is ideal for indoor or outdoor

Designed to quickly produce hot coals for cooking

COMPACT SIZE FOR SMALL TO MEDIUM GRILLS: Measures 8.1 x 5.7 x 10 inches and is built for small to medium sized grills, not full-sized ones. Check these dimensions against your grill before ordering. Sits on top of a cold, clean grill.
Arrange Coals for Direct, Indirect, or Two‑Zone Cooking
When you arrange the coals, you decide whether you’ll grill with direct heat, indirect heat, or a hybrid two‑zone setup, and each layout dictates the temperature profile and cooking zone you’ll get. For rapid searing, spread a single layer of lit charcoal across the entire grate to create a uniform 232‑288 °C fire—perfect for fish, burgers, or thin cuts. To protect a half‑zone, pile coals on one side, leaving the opposite side empty; this two‑zone configuration yields a hot direct zone and a cooler indirect zone (121‑177 °C) for roasts or ribs. For greater control, use three equal piles on opposite sides, forming a central indirect zone that lets you arrange multi tiered coal configurations or arrange charcoal for elevated indirect cooking, mastering low‑and‑slow smoking or delicate roasting. The log cabin method promotes airflow for even, consistent burn. To stabilize your temperature once coals are arranged, keep the grill lid closed as much as possible during cooking to maintain consistent heat levels.
Preheat Your Charcoal Grill & Oil Grates
If you light the coals in a chimney starter, you’ll have a uniformly hot grill in just 10‑15 minutes. As the coals turn grey‑white, monitor preheat progress and adjust the damper to lock in temperature. Spread the ashed coals evenly to select ideal cooking surface, eliminating hot spots before you close the lid. After the lid seals, let the grill stabilize for another 10‑15 minutes; this builds the 450‑550°F range needed for most dishes. While the grill heats, brush the grate with a high‑smoke‑point oil using a paper towel attached to tongs—this prevents sticking and creates a crisp sear foundation. Keep a thermometer handy; precise readings let you fine‑tune airflow to ensure consistent heat throughout the cooking session. Remember, larger grills take longer to preheat, so allow extra minutes if your grill is big.

Graza Frizzle Oil Made from 100% Olives: A neutral-flavored, high heat cooking oil made from 100% peak harvest olives. With a smoke point of up to 450 degrees, Frizzle is your high-heat kitchen hero. 1 bottle/750ml.

Graza Frizzle Oil Spray Made from 100% Olives: A neutral-flavored, high heat cooking oil made from 100% peak harvest olives. With a smoke point of up to 450 degrees, Frizzle is your high-heat kitchen hero. 1 can/5 oz.

Light Buttery Flavor That Elevates Every Meal: Algae Cooking Club Chef-Grade Algae Oil enhances every dish with subtle richness. Its neutral profile makes it ideal for searing, baking, and dressings, transforming everyday meals into gourmet experiences.
Sear Quickly Using Direct‑Grill Techniques
Now that the grill is preheated and the grates are slick with oil, stack the lit coals into a concentrated mound covering two‑thirds of the cooking surface to create a blistering hot zone. You’ll open the vents fully, letting oxygen feed a 400‑500 °F blaze that sears instantly. Pat your steak dry, salt it 40 minutes early, then pepper all sides. Place the meat directly over the coals, let it sear for 60 seconds, rotate 45° for crosshatch marks, flip, and repeat. Keep the lid on to curb flare‑ups. While you’re mastering this direct‑grill method, you can also utilize infrared searing technology for a crust that locks juices. Choose cuts with good marbling like New York Strip or Ribeye for optimal results. For thicker cuts, employ reverse sear method later, but for now focus on that blistering, high‑heat contact. Direct grilling provides the intense heat needed for a rapid sear.

Nonstick & Easy to Clean: The Switzerland ILAG nonstick coating is very effective in preventing anything from sticking to the surface, even with minimal oil, and also makes cleaning a breeze, just wipe it with a paper towel or rinse it with water. Free of PFOA and PFOS.


【Perfectly Compatible】Compatible with Chargriller 1224 E1224 1324 2121 2222 2123 2727 2828 2799 2929 E2735 E2137 E2828,E2929,E3724 Charcoal Grills. Oklahoma Joe Charcoal 15202031,17202052, 19302087 Charcoal Grill. Gourmet Charcoal Grill CC1830F CC1830R CC1830S, CC1830SC CC2036F CC1830FB
Finish Thick Cuts With Indirect Heat
Three‑quarters of the grill’s heat should be dedicated to a blazing direct zone while the remaining third forms an indirect “oven” that lets thick cuts finish evenly without burning. Set charcoal on one side, position the meat over a centered drip pan, and close the lid. Sear the cut for a few minutes, then move it to the indirect zone for the slow finish. Keep vents open over the food to circulate convection, and add water‑soaked wood chips for smoke management. Monitor temperature with a probe; aim for medium heat (≈250‑300 °F) in the indirect area. Adjust airflow dampers to maintain that range, adding charcoal every 30‑60 minutes if needed. This method preserves moisture, prevents charring, and delivers consistent internal doneness. After the meat reaches the desired internal temperature, allow it to rest for about 10 minutes to redistribute juices before slicing. Low and slow cooking ensures the meat becomes tender and pulls apart easily.
Maintain Temperature & Airflow While Cooking
After searing the thick cut in the direct zone, you’ll want to lock in the temperature and airflow to finish it evenly. Close the lid and set the bottom intake and top exhaust vents to a half‑open stance, then Adjust vent position in small increments as you monitor the probe. By regulating airflow supply you keep combustion steady without starving the coals. If the thermometer reads high, close the intake damper halfway; if it drops, open it just enough to revive the ember glow. Keep the lid closed, opening it only for essential checks, and use a water pan or foil‑wrapped bricks to buffer spikes. The circulation of hot air convection inside the grill chamber helps cook the food more evenly when the lid remains closed. Consistent adjustments every 15‑30 minutes maintain a uniform, oven‑like environment for perfect indirect cooking. Properly arranging the fire using the Minion Method ensures a long, steady heat source for low‑and‑slow cooking.
Troubleshoot Grill Problems & Stay Safe
If you notice uneven flames, a leaky lid, or a weak ignition, you’re already facing the most common grill failures that can turn a tasty session into a safety hazard. Inspect for grill damage by tapping the lid edge, listening for hollow sounds, and pressing on weak spots to restore a tight seal. Warm the lid with a few lit briquettes before micro‑adjustments, and repeat until smoke no longer escapes. Detect pest infiltrations by scanning for droppings, spider webs, or chewed wires, then clear debris and seal openings. Guarantee charcoal is fully lit—use a chimney starter and avoid reusing partially burnt coals—to achieve consistent heat. Regularly clean grease traps, check burners for clogs, and verify regulator connections before each cook to keep fire risk at bay. Hugging the lid can restore shape and improve the seal.