
Pick a 1.5‑2‑inch‑thick porterhouse that meets the USDA’s 1.25‑inch tenderloin minimum and is Prime or Choice. Pull it from the fridge and let it sit until the surface feels cool but the interior is uniform—no long 30‑minute rest needed. Sprinkle coarse salt, a pinch of pepper (≈0.5 % of the steak’s weight), and a thin coat of high‑smoke‑point oil. Light a chimney with 12‑15 briquettes, dump them to one side for a 450‑550 °F direct zone and keep the opposite side at 250‑350 °F indirect. Sear each side 2‑3 minutes, rotating 45° for a cross‑hatch crust, baste with herb‑garlic butter, then move to indirect heat until the internal temp reaches 120‑125 °F for rare or 130‑134 °F for medium‑rare. Rest 5‑15 minutes before slicing. Continue and you’ll uncover how to finish the fat cap with a quick high‑heat blast and troubleshoot common issues.
Pick the Ideal Porterhouse Size for Grilling
A solid 1.5‑2‑inch‑thick porterhouse is the sweet spot for grilling, giving you a juicy, evenly cooked steak without overcooking the tenderloin. You should aim for a cut that meets USDA’s 1.25‑inch tenderloin minimum, but the 1.5‑2‑inch range gives the best balance. This size, typically 1.5‑2 lb, serves two hungry diners or three‑four with sides. Choose a Prime or Choice grade; the marbled quality showcase guarantees moisture retention during the sear. Look for a bright red, butcher fresh appearance—dull or brown tones signal lower quality. The thickness lets you start with a hot 450‑500°F zone, then finish indirect, avoiding over‑cooking the filet side while forming a perfect crust. Allowing the steak to reach room temperature before grilling ensures even cooking throughout both the strip and tenderloin sections. For optimal flavor, consider using a high‑heat sear to develop a caramelized crust before finishing.


This perfect steak combines two prized steakhouse. cuts into one: The Filet Mignon on one side and The NY Strip Steak on the other

ULTIMATE STEAK PERFECTION: Treat yourself to the epitome of steak perfection with our Porterhouse Steak, 4 count, 22 oz each, meticulously crafted to satisfy even the most discerning beef connoisseur's palate.
Bring Your Porterhouse Steak to Room Temperature – Why & How Long
Why bother letting a porterhouse sit out before it hits the grill? You don’t need to. The 30‑45‑minute room‑temperature myth adds no value and only removes extra resting time. Professional kitchens keep steaks refrigerated until searing, and the same technique works at home. Cold meat starts at a uniform lower temperature, which reduces overcooking risk and gives you predictable carryover—about 5 °F after the pan. Pull the steak at 120 °F for a medium‑rare finish, then let it rest outside the pan to hit 130‑134 °F. Use a fast‑reading thermometer to monitor temperature throughout. By cooking straight from the fridge, you maintain cooking precision without unnecessary waiting. For best results, ensure your cooking surface reaches the proper temperature before searing, as preheated equipment is essential for developing a quality crust. The tenderloin portion cooks faster than the NY strip side, so searing both sides evenly is essential.
Season Your Porterhouse Steak: Salt‑Pepper Rub or Herb‑Garlic Butter?
After chilling the steak straight from the fridge, you’ll want to lock in flavor before the grill does its work. Use proper salt application: sprinkle coarse kosher or sea salt evenly on both sides, then add freshly ground black pepper. Aim for ideal seasoning ratios—about 1 % salt by weight and 0.5 % pepper—so the rub enhances the meat without overwhelming it. Massage a thin layer of high‑smoke‑point oil first for better adhesion. If you prefer herb‑garlic butter, melt butter, stir in garlic powder, minced garlic, thyme, and rosemary, then baste halfway through cooking or during the rest. The butter adds moisture and aroma, while the rub builds a robust crust. Choose the method that matches your desired texture and flavor profile. For the most precise results, use an instant-read thermometer to monitor doneness throughout cooking. The short loin contains both the strip steak and tenderloin, giving the porterhouse its signature size and flavor.

Premium kosher sea salt from the Mediterranean


PREMIUM QUALITY - Haddar Kosher Salt is sourced directly from the pristine Waters of the Mediterranean Sea in Sicily, Italy, providing you with a naturally mineral rich, high quality, coarse salt.
Set Up a Two‑Zone Grill and Oil the Grates for a Perfect Sear
Turn on the grill and let the coals blaze in one half while the other half stays cool, then oil the grates before the steak hits the heat. Light a chimney starter with 12‑15 briquettes, wait until they’re white‑ash, and dump them onto the unlit bank to create a direct‑heat zone of 450‑550 °F. Keep the opposite side free of charcoal for an indirect zone of 250‑350 °F. Use a high‑smoke‑point oil and a folded paper towel or brush for the oil application method; spread a thin, even coat across both zones just before closing the lid. Maintaining clean ash catchers ensures consistent airflow between your two temperature zones. This heat zone management lets you sear instantly on the hot side and finish gently on the cool side, preventing flare‑ups and ensuring a perfect crust. Adjust airflow to maintain the temperature difference between zones.

Light Buttery Flavor That Elevates Every Meal: Algae Cooking Club Chef-Grade Algae Oil enhances every dish with subtle richness. Its neutral profile makes it ideal for searing, baking, and dressings, transforming everyday meals into gourmet experiences.

Graza Frizzle Oil Made from 100% Olives: A neutral-flavored, high heat cooking oil made from 100% peak harvest olives. With a smoke point of up to 450 degrees, Frizzle is your high-heat kitchen hero. 1 bottle/750ml.
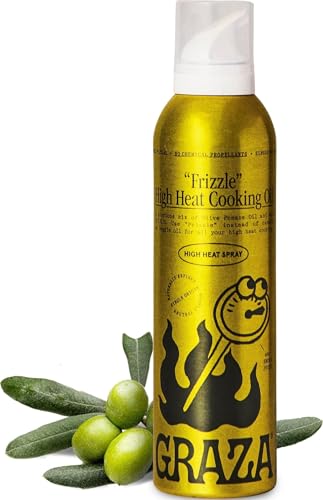
Graza Frizzle Oil Spray Made from 100% Olives: A neutral-flavored, high heat cooking oil made from 100% peak harvest olives. With a smoke point of up to 450 degrees, Frizzle is your high-heat kitchen hero. 1 can/5 oz.
Sear the First Side of the Porterhouse – Timing & Cross‑Hatch Tips
Two minutes on the hottest part of the grill is enough to lock in flavor and start a deep, caramelized crust. First, preheat a cast‑iron pan for five to seven minutes over high heat; add a thin film of oil once the surface smokes. Pat the steak dry, season, and lay it on the pan without moving it for the first 2 minutes. After 2 minutes, lift the steak, rotate it 45°, and return it for another 2 minutes to create cross‑hatch marks. Crust indicators appear when the meat releases effortlessly and the underside shows a rich brown color. Trust the release cue; then flip only when the crust is firm and evenly browned. This timing and rotation give a perfect sear and distinct grill‑mark pattern. Letting the steak rest after the initial sear allows residual heat to continue developing the crust. Use a thermometer to verify the internal temperature before flipping.
Flip and Sear the Opposite Side – Keep the Crust Intact
A solid flip at the 75 °F mark—just after the indirect phase—lets you preserve the caramelized crust while the opposite side begins its own sear. When you flip, keep the bone‑end toward the lit burner and the fat side down to avoid sagging. Immediately baste with butter, garlic, and herbs; the sizzle reinforces the Maillard layer and helps you maintain crust integrity. Place the steak on high heat (450‑500 °F) and sear the opposite side evenly for three minutes, watching for a firm, non‑sticking release before moving it. Aim for an internal temperature of 120‑125 °F for rare or 130‑135 °F for medium‑rare. After searing, let the steak rest briefly to lock in the crust. Preheat the grill to 300°F before starting the indirect cooking phase. Resting the steak for 5–15 minutes after searing allows the juices to redistribute and ensures a tender, flavorful result.
Move the Steak to Indirect Heat and Monitor Internal Temp
After searing, slide the steak onto the cooler side of the grill and close the lid, letting it cook gently at 250 °F. Position it away from the flame, then turn it every 10 minutes for uniform heat. Insert an instant‑read probe into the thickest part, away from bone, and begin internal temperature monitoring at the 30‑minute mark. Aim for 115 °F if you’ll finish with a high‑heat sear, or 110 °F for a rare finish. The steak will reach its target after 30‑45 minutes, depending on thickness. Once the desired temperature is hit, remove the steak and cover it loosely with foil for proper resting time, allowing the heat to rise 5‑10 °F before the final sear. For the best crust development, internal temperature is the most reliable indicator of doneness rather than time alone. Flip the steak every minute during the initial sear to ensure an even crust.
Finish the Fat Cap With a Quick High‑Heat Blast for Crunch
Precision matters when you give the fat cap a quick, high‑heat blast for crunch. Grab tongs, tilt the steak, and coat the exposed edge with a thin layer of avocado oil. The oil’s high smoke point lets you sear the fat cap for 60‑90 seconds without smoking, keeping the surrounding meat untouched. Hold the steak vertically or on its side so heat hits the fat evenly; this renders the thick layer, turning it golden brown and creating a crisp exterior. The result is a striking fat cap appearance and a satisfying crunch that contrasts with the juicy interior. You’ll notice a subtle boost in mouthfeel and visual appeal, while the overall steak quality improves only marginally. Dry brining enhances crust by drying the surface for better energy transfer during searing. For optimal results, bring your steak to room temperature before searing to ensure even heat distribution throughout the meat.
Rest, Slice Against the Grain, and Add Compound Butter
Rest the porterhouse for five to ten minutes on a carving board, then slice it into thin strips perpendicular to the grain before drizzling the warm compound butter over the meat. Let the steak rest; internal temperature will climb 5‑7 °F, and juices will redistribute, preserving moisture. Identify the grain on each side—strip loin runs parallel to the bone, tenderloin is finer. Cut across the fibers to shorten them, yielding tenderness and a clean edge that maximizes color. While the steak rests, melt butter with crushed garlic and thyme, then baste briefly until it foams. The Maillard reaction on the surface creates complex flavors that complement the aromatic butter perfectly. Spoon the aromatic butter and pan drippings over the sliced strips, ensuring each piece shines. Serve immediately, arranging the ribbons to present beautifully on the plate. The USDA requires a porterhouse tenderloin to be at least 1.25 inches wide.
Troubleshoot Common Porterhouse Problems – Over‑Seared, Under‑Cooked, Sticking
If you notice a porterhouse turning black before a crust forms, it’s likely being over‑seared; the same grill can also leave it under‑cooked or cause it to stick when you try to flip it. To avoid over‑searing, sear two minutes per side on high heat, then move the steak to a 280‑300 °F zone. Keep the grill closed to maintain temperature and season after the initial sear to prevent bitter darkening. For under‑cooking, start with a steak at room temperature, flip only once after 60 % of the cook, and finish in indirect heat until the internal temperature hits 135‑140 °F for medium. Prevent sticking and tearing by patting the meat dry, oiling the grates, and waiting for a firm crust before flipping. Using a meat thermometer ensures you reach your target doneness without guesswork. This approach guarantees achieving even doneness while minimizing flare‑ups and uneven cooking. Drying the exterior helps form a better crust.